
Static website in S3 with Password Protection
Coming from Apache or NginX, you would think of adding password protection to a static website as a trivial problem.
All you do is generate a file containing usernames and password hashes and then reference it in the web server
configuration or (in Apache) possible a .htaccess file.
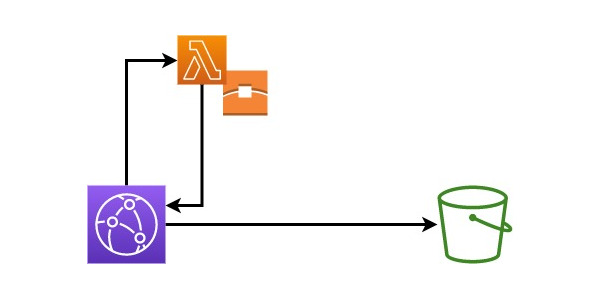
Unfortunately, adding password protection to a static website hosted in AWS S3 behind CloudFront isn’t quite as simple. You will have to use a Lambda which authenticates and passes through the request or rejects it as unauthorised. Now, that still sounds rather straightforward but there are a few pitfalls.
This walkthrough will provide you with a Terraform module which creates a setup as described above. I’ll go through the configuration step by step and point out the pitfalls to watch out for.
Setting up the S3-hosted website
This part is straightforward, and you will find many tutorials that tell you in detail how to go about it. What we need is an S3 bucket, a certificate and a cloudfront distribution. As we are building a module, we want to declare a few variables first, so the module can be re-used. You might want to add more variables, but as a minimum, we probably want to pass in a fully qualified domain name (FQDN) for the website.
variable "fqdn" {
  type = string
}
Next, we need to make sure that the AWS provider used by the parent is compatible with the module. To be future-proof, I’m using version 4 of the Terraform AWS provider. This results in the S3 configuration being quite different from v3. However, there are many good tutorials for setting up an S3-hosted website which use v3 syntax if you need help with that.
Our provider configuration then looks like this:
terraform {
  required_providers {
    aws = {
      source  = "hashicorp/aws"
      version = "~> 4.0"
    }
  }
}

provider "aws" {
  alias  = "useast1"
  region = "us-east-1"
}
You might be surprised that we declare an AWS provider for us-east-1 here. The reason for that is that the provider
inherited from the parent could be set to any region. However, some f our configuration has to be in us-east-1
even if your infrastructure is generally in a different region. More on that later.
In v4 of the AWS provider, the configuration will look something like this:
resource "aws_s3_bucket" "website_s3" {
  bucket = var.hostname
}

resource "aws_cloudfront_origin_access_identity" "s3_cloudfront_oai" {
  comment = "CloudFront Access Identity for S3 hosted website ${var.fqdn}"
}

resource "aws_s3_bucket_policy" "policy_s3" {
  bucket = aws_s3_bucket.website_s3.id
  policy = jsonencode({
    Version = "2012-10-17"
    Statement = [
      {
        Sid = "S3WebBucket"
        Principal = {
          AWS = aws_cloudfront_origin_access_identity.s3_cloudfront_oai.iam_arn
        }
        Action   = "s3:GetObject"
        Effect   = "Allow"
        Resource = ["${aws_s3_bucket.website_s3.arn}/*"]
      }
    ]
  })
}

resource "aws_s3_bucket_acl" "acl_s3" {
  bucket = aws_s3_bucket.website_s3.id
  acl = "public-read"
}

resource "aws_s3_bucket_website_configuration" "website_config" {
  bucket = aws_s3_bucket.website_s3.id

  index_document {
    suffix = "index.html"
  }

  error_document {
    key = "error.html"
  }
}

resource "aws_s3_bucket_cors_configuration" "website_cors" {
  bucket = aws_s3_bucket.website_s3.id

  cors_rule {
    allowed_headers = ["Authorization"]
    allowed_methods = ["GET", "HEAD"]
    allowed_origins = ["https://${var.hostname}"]
    max_age_seconds = 3000
  }
}
Of course, there are a bunch of tweaks you could make to the S3 configuration to make it fit your exact scenario. The official Terraform documentation for S3 buckets should come in handy here.
As it is 2022 and nobody runs websites on HTTP any more (well, nobody should run websites on HTTP any more), we will also need to create a certificate. Certificates in AWS need to be validated to ensure that they are only registered by someone who actually has control over the certificate’s subject domain. AWS offers two different ways of validating a certificate. One is via email and the other via DNS. While Terraform allows you to configure your certificate for either, if obviously cannot intercept an email that’s sent to you. So, the validation process will then have to be completed manually, and you might even have to re-apply your configuration if the first attempt times out before you have validated your certificate.
If you use DNS validation and have the DNS for the domain your website is in in the same AWS account’s Route 53, you can
have Terraform create the validation records,
so everything is automated. In order for the module to be integrated with automatic validation, we return the
domain_validation_options and arn of the aws_acm_certificate object in Terraform which can then be used in the
parent (or another module) for that purpose.
So, without further ado, here is the certificate configuration along with its outputs:
resource "aws_acm_certificate" "cloudfront_cert" {
  provider          = aws.useast1  // CloudFront needs the certificate to be in us-east-1

  domain_name       = var.fqdn
  validation_method = "DNS"
}

output "certificate_domain_validation_options" {
  value = aws_acm_certificate.cloudfront_cert.domain_validation_options
}

output "certificate_domain_validation_arn" {
  value = aws_acm_certificate.cloudfront_cert.arn
}
You may have noticed that I have now used the aws.useast1 provider. The reason for that is that to use a certificate
with a CLoudFront distribution, it has to be in the region us-east-1 even if you generally define your
infrastructure to be in other regions.
If we only wanted to have a plain, static website, we’d set up the CloudFront distribution next. However, because we want to use HTTP Basic Authentication to protect the site with a password, we have to take one more step before we get to that.
Unfortunately, there isn’t any kind of switch on CloudFront distributions that would allow you to just define a username and password. Instead, CloudFront supports what AWS calls [Lambda @ Edge] which is a Lambda CloudFront runs before serving any contents. That Lambda can then also return a HTTP status 401 prompting CloudFront to send that code back to the requester and not serve the contents.
Lambda @ Edge supports Node and Python code. We will use Python code here but if you prefer, you can also use e.g. this Node code instead.
The Python script we are going to use looks like this:
from base64 import b64encode
import re


def handler(event, context):
    realm = "My Password Protected Website"
    exp_user = 'someuser'  # TODO: Change to the username you want to use
    exp_pass = 'changeme'  # TODO: Change to the password you want to use
    exp_auth_string = b64encode(f'{exp_user}:{exp_pass}'.encode('ascii'))

    req = event['Records'][0]['cf']['request']
    headers = req['headers']

    auth_str = ""
    if headers.get('authorization') and len(headers['authorization']) and headers['authorization'][0]['value']:
        auth = re.split(r'\s+', headers['authorization'][0]['value'])
        if len(auth) > 1:
            auth_str = auth[1]

    response = {
        'body': 'Unauthorized',
        'bodyEncoding': 'text',
        'status': 401,
        'statusDescription': 'Unauthorized',
        'headers':
            {
                'www-authenticate': [
                    {
                        'key': 'WWW-Authenticate',
                        'value': 'Basic realm="' + realm + '"',
                    }
                ]
            }
    }

    if auth_str.encode('ascii') == exp_auth_string:
        return req

    return response
As you can see, the username and password are hardcoded in the script. Unfortunately, Lambda @ Edge is not quite as powerful as normal Lambdas and does not allow you to pass in an environment. So, if you want to change the username and password or introduce more username/password combinations, you will have to update the Lambda.
The structure of the incoming event might also be a bit confusing, so you might want to refer to the official documentation about it.
Note also how when we deny access, we send a WWW-Authenticate header which instructs the browser to prompt for a
password. You can set the realm for that header line to whatever you want. The text you put as the realm will be
displayed in the dialog the browser displays to request username and password. If you wonder about any of the other code,
you might want to read up on HTTP Basic authentication.
To use the code shown above, we zip it up and place it in a folder called lambda-src inside the module. We then
configure a Lambda as follows.
So, now that we have everything in place to configure our CloudFront distribution. Again, you may want to tweak some settings. Just refer to the official documentation to find out what can be done and how.
resource "aws_cloudfront_distribution" "s3_cloudfront" {
  origin {
    domain_name = aws_s3_bucket.website_s3.website_endpoint
    origin_id   = "S3-www.${var.fqdn}"

    custom_origin_config {
      http_port              = 80
      https_port             = 443
      origin_protocol_policy = "http-only"
      origin_ssl_protocols   = ["TLSv1", "TLSv1.1", "TLSv1.2"]
    }
  }

  aliases = [var.fqdn]

  enabled             = true
  default_root_object = "index.html"

  custom_error_response {
    error_caching_min_ttl = 0
    error_code            = 404
    response_code         = 200
    response_page_path    = "/index.html"
  }

  default_cache_behavior {
    allowed_methods  = ["GET", "HEAD"]
    cached_methods   = ["GET", "HEAD"]
    target_origin_id = "S3-www.${var.fqdn}"

    forwarded_values {
      query_string = false

      cookies {
        forward = "none"
      }
    }

    viewer_protocol_policy = "redirect-to-https"
    min_ttl                = 31536000
    default_ttl            = 31536000
    max_ttl                = 31536000
    compress               = true

    lambda_function_association {
      event_type   = "viewer-request"
      lambda_arn   = aws_lambda_function.fixed_http_basic_auth.qualified_arn
      include_body = false
    }
  }

  restrictions {
    geo_restriction {
      restriction_type = "none"
    }
  }

  viewer_certificate {
    acm_certificate_arn      = aws_acm_certificate.cloudfront_cert.arn
    ssl_support_method       = "sni-only"
    minimum_protocol_version = "TLSv1.1_2016"
  }
}

output "cloudfront_hosted_zone_id" {
  value = aws_cloudfront_distribution.s3_cloudfront.hosted_zone_id
}

output "cloudfront_fqdn" {
  value = aws_cloudfront_distribution.s3_cloudfront.domain_name
}
The output for the distribution’s FQDN and hosted zone ID are once again yo allow you to set up DNS records (in Route 53 or elsewhere).
And, that’s it. We are done. You can see the complete configuration on Github and download it if you haven’t built it as you read through the post. Once you have applied it and configured DNS, accessing your website will result in a password dialog which you can pass by entering the username and password you put in your Lambda’s code.